Friday, July 27, 2012

Healthy Eating without Breaking the Bank and NOT Using Coupons

Cooking can be expensive, especially if you love experimenting. Cooking healthfully, let alone organically, has almost become cost prohibitive. Why on earth are 4 ears of corn $5 at Fresh Market?! I understand there is a drought, but come on. Those bad boys are $0.50 at the Farmers Market!
I am a pretty stubborn person, and I love to cook. When I noticed prices steadily and dramatically climbing on the foods we loved, I was determined to find a way to eat the same foods without suffering financially. I never found coupons useful because they are often for processed foods. Plus I have NO patience for coupons. So this is the first of (hopefully many) posts on resourcefully shopping for healthy and/or organic products. Warning: it does require quite a bit of effort, and multiple grocery store trips throughout the week, but if you are a foodie and eating healthfully/organically is important to you, it will be well worth your while. And once you slide it into your routine, it becomes much more manageable. Do routine things routinely and your productivity will improve, as will your quality of life. I don't want to get on a soap box, I just wanted to share what works for me and hope that it works for others out there too!
So here are a few tips/things I do that go against the grain of main-stream thought, but work for me.
1) I always buy what I can on sale. If it's meat, I buy a bunch and freeze it. If it is produce, I buy it and make sure I plan to use it either the same night, or within the next couple days. If it is produce like spinach, you can even freeze it and use it in smoothies.
2)  I go shopping and buy the produce/products that are on sale/in season and plan my meals around that. The less expensive the produce, the better it is because it is in season! If it is a special occasion, or I feel like experimenting, I don't plan a meal I have no ingredients for. (Spices or vinegars are an exception. I will go out and buy a spice if I need it for a recipe. )
3) As much as I love to, I don't do all of my shopping at specialty stores like Whole Foods (great stock to possibly invest in btw, google it NYSE:WFM). I go to a variety of stores, as they always have their different sales or specials. Most grocery stores also have an "Organic Aisle/Section" that is great. It also prevents me from going nuts/being overwheled by all the delicious choices! If there is a particular or weird ingredient I need, I will try and shop locally or even on the internet.
4) I subscribe to a more European school of thought and grocery shop probably 4 or more times a week. To help make this routine, I usually stop by on my way home from work. They are not long trips, and often I go for the express purpose of perusing the organic aisle to see if anything is on sale. Kroger has these awesome "Managers Specials" where they mark down items to at least 50% off. Some version of Organic Yogurt is always on sale. So I buy a couple containers at a time instead of a whole weeks or two weeks worth. It's great for variety too :). Often, the smaller organic milks go on sale because people most commonly buy the Gallon. Publix almost always has a BOGO.


5) I buy produce when I can from Farmers Markets. Their produce is always pretty competitively priced, especially for the quantity you buy, and it is always in season.
6) If there is a non-perishable, very versatile, and/or freezable item on mega sale I buy in bulk. An example here would be nuts. Sometimes they go on sale for as much as 75%-90% off and you can use them SO many ways: plain, as flour, ground into nut butters, dressings, smoothies etc. And they refrigerate and freeze for forever.
7) I almost never throw any food away. If it is a fruit or a vegetable and it looks like it might go bad soon and I won't have time to cook it, I will either chop it up and freeze it, or puree it and freeze it. (I learned this after making and storing my son's babyfood.) For example, if it is zucchini, I puree it and freeze it and might use it for zucchini bread. Bananas I definitely slize and freeze. Bananas are awesome, you can re-purpose them in SO many ways; in bread, as a natural sweetener, in oatmeal, in smoothies, pancakes, smothered in chocolate or peanut butter. I will buy old bananas on sale just to cut them up and freeze them. You can pretty much puree and freeze any fruit or vegetable. If you absolutely cannot think of any way to repurpose some of them, they make great, flavorful additions to soups, broths or sauces!
Like I said, this method of shopping requires a bit of time and effort, but if you think about it, it takes up the same amount of time, it's just more spread out. I never spend more than 20-30 minutes in the grocery store and my bills are almost never more than $50. I remember as a kid going on marathon trips to the grocery store that lasted for hours and resulted in 3 figure bills routinely.
Another reason I enjoy this style of shopping/cooking is that I am not an inherently creative person. My creativity is born of either necessity or resourcefulness. This kind of lifestyle forces creativity and it is really fun and exciting for me to explore so many new ways of doing different things.

Wednesday, July 25, 2012

The Joys of Cloth Diapering- The Set Up

Cloth diapering was the catalyst, for me, for this minimal waste, natural, holistic way of life. I don't judge anyone who uses regular diapers at all, in fact I use Seventh Generation Organic (biodegradable) diapers when I travel or go out for long periods of time. I just wanted to do my part in reducing the amount of little poop filled pacakages that accumulate and don't biodegrade in a landfill. It's just a personal choice of mine and it has been very rewarding.
From my cloth diapering adventures, I discovered new, natural ways to treat rashes and other diaper area problems. I really enjoyed researching the problem, discovering what caused it and troubleshooting a solution on my own, instead of just slathering on some prescribed cream whenever there is a rash or funny looking mark down there. It just bothers me that I don't know exactly what makes those creams work and why. There's always a why with me. There have been occassions that I haven't been able to clear things up on my own and I have gone to the Doctor, but I like giving it my own shot first.

Anyhow, I figured I would detail my set up in my first cloth diapering entry, just in case anyone was as confused and as clueless as I was when I first started.
I started with an extra long changing table, with two drawers underneath for storage, and it is slightly higher than waist high (roughly 3 feet). My husband built this one. The drawer on the left holds all of my covers (I use bum genius) and the right side holds all of my inserts. I used to wash, stuff and store all of the diapers in both drawers, but that got to be extremely cumbersome and bulky. It takes almost no time to quickly stuff a diaper right when I need it. Below the table are 4 labeled cloth bins where I keep all of his clothes. We kept the table green so we could just change the handles if we wanted to for different genders!


This is the left side of the top of the changing table. I have a standard changing table pillow with a plush cover so it isn't freezing when I set a baby on it. To the left of that is a wipe warmer. Sounds silly I know, but I use wet baby washcloths (when I can) in place of wipes. This warmer stores them beautifully and keeps the rags warm so I'm not putting freezing cold wet cloth on sensitive baby areas! You never know what chemicals are in those wipes... even the organic ones. Plus sometimes a substantial diaper deposit requires SEVERAL wipes, but only one washcloth. It works like a charm. The rags don't get mildewy or moldy because I go through them and wash them about every 3 days.


This is the right side of the changing table. Here is where I keep any saline I might need, cloth diaper friendly diaper creams (Calendula is amazing), towels... and unfortunately other paraphernalia that happens to accumulate (like shoes in this picture).


I have a little red bucket (with lid) for the wet diapers and a blue one for soiled diapers. After you knock the solids from a soiled diaper into the toilet, there is usually very little to clean. I usually rinse them off with a hose outside and then put them in a bucket. I did try and install a sprayer onto our toilet, but unfortunately that did not turn out as planned.

To wash the diapers, I do a cold soak cycle with 1/4 cup of borax or good old fashioned baking soda. Then I do a heavy duty hot wash with 1/4-1/2 of a scoop of Allens Naturally detergent. After that I line dry the inserts and shells in the sun to natually bleach away whatever didn't come out in the wash! I try to soak over night and wash in the morning to maximize sun time!

Sometimes even Little Man helps clean his diapers ;).


Monday, July 23, 2012

DIY Wooden Pallet Sandbox


Our neighborhood is currently undergoing a period of expansive growth. Homes are sprouting up all over the place, which is a good thing. It's good to see some life in the economy. With construction sites, come large amounts of garbage. However, if you look closely, much of that garbage is very usable and (sometimes) good quality wood!
After observing these wood piles steadily growing, I decided to hop over and ask the site workers if the wood was garbage and if I could have any. I didn't know what kind of wood I would want or what my projects would be, but I figured it would be fun to do a project with it. They waved towards a pile and said I could take whatever I wanted.
Among some other pieces, wooden pallets seemed to be a good bet to me. They were already box shaped, had several slats and seemed pretty sturdy. If nothing else, I figured I could stick some wheels on the bottom and use them to move heavy equipment, as we do not have a dolly.
I started perusing the internet for wooden pallet ideas and saw tons of ideas for furniture, raised garden beds, storage etc. Here are a few. I mean, isn't it wild what you can do with wooden pallets?!


Anyhow, around this time, my toddler was taking a big interest in sand. Sand everywhere. At the beach, the sidewalk, the road. He loved this gritty stuff. So I thought, why not make a sandbox? Seemed easy enough, I mean it was already a box. I just had to figure out a way not to let the sand fall out through the bottom.
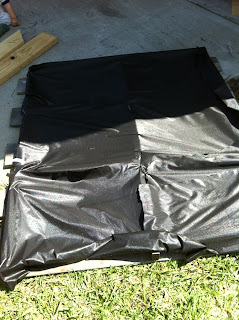
I selected a pallet with no top. I had some left over landscaping fabric from my wooden pallet garden, so I just used an industrial stapler and stapled 2 layers of that over the bottom. I set that in a shady area and bought 3 bags of sandbox sand from Home Depot (it is less than $3 per bag...) and dumped it in there. SUPER easy. Probably took me longer to take pictures, write this post and import them than the project ;).